User Management
This guide will take you through the API calls for creating, deleting, updating, and managing users.
It is important to understand the different concepts when starting with the Wallet API. When it comes to user management, two essential concepts are the User and the Signing Method.
A User can be seen as an end user of your application, or if you don't have the concept of end users, it can be seen as your company or your account (an excellent example of this last scenario is when you use the wallet API as a company treasury.) In any case, you will have at least one User that holds one or multiple wallets.
To secure those wallets, each User has what we call a Signing Method, which can be seen as a type of password to access the wallets belonging to that User. Signing methods act as the gateway to a user's wallets. Venly offers three types of Signing Methods.
- PIN: a six-digit code similar to a credit or debit card code.
- Emergency Code: a long string of characters resembles a long, complex password.
- Biometric: biometric data such as a fingerprint or facial recognition data
A User needs at least one signing method but can go up to three if desired. Each signing method gives access to the User's wallets. The users can use the signing method to add, remove, or reset another signing method. This allows you to build a customer-centric recovery flow tailored to your specific user base and application.
We recommend to make use of 2 or more Signing Method for each user, as that allows recovery in case the end user forgets one of the Signing Method. Learn more about Signing Methods
In case all Signing Methods are lost for a specific User then the access to all that User's wallet is lost.
Below you can find a visual representation of one User which has 3 Signing Methodswhich gives him access to two wallets. There is also a second User which only has one Signing Method to access one wallet.
In this specific scenario, User #1 would be able to reset his PIN by using the Biometric Signing Method.
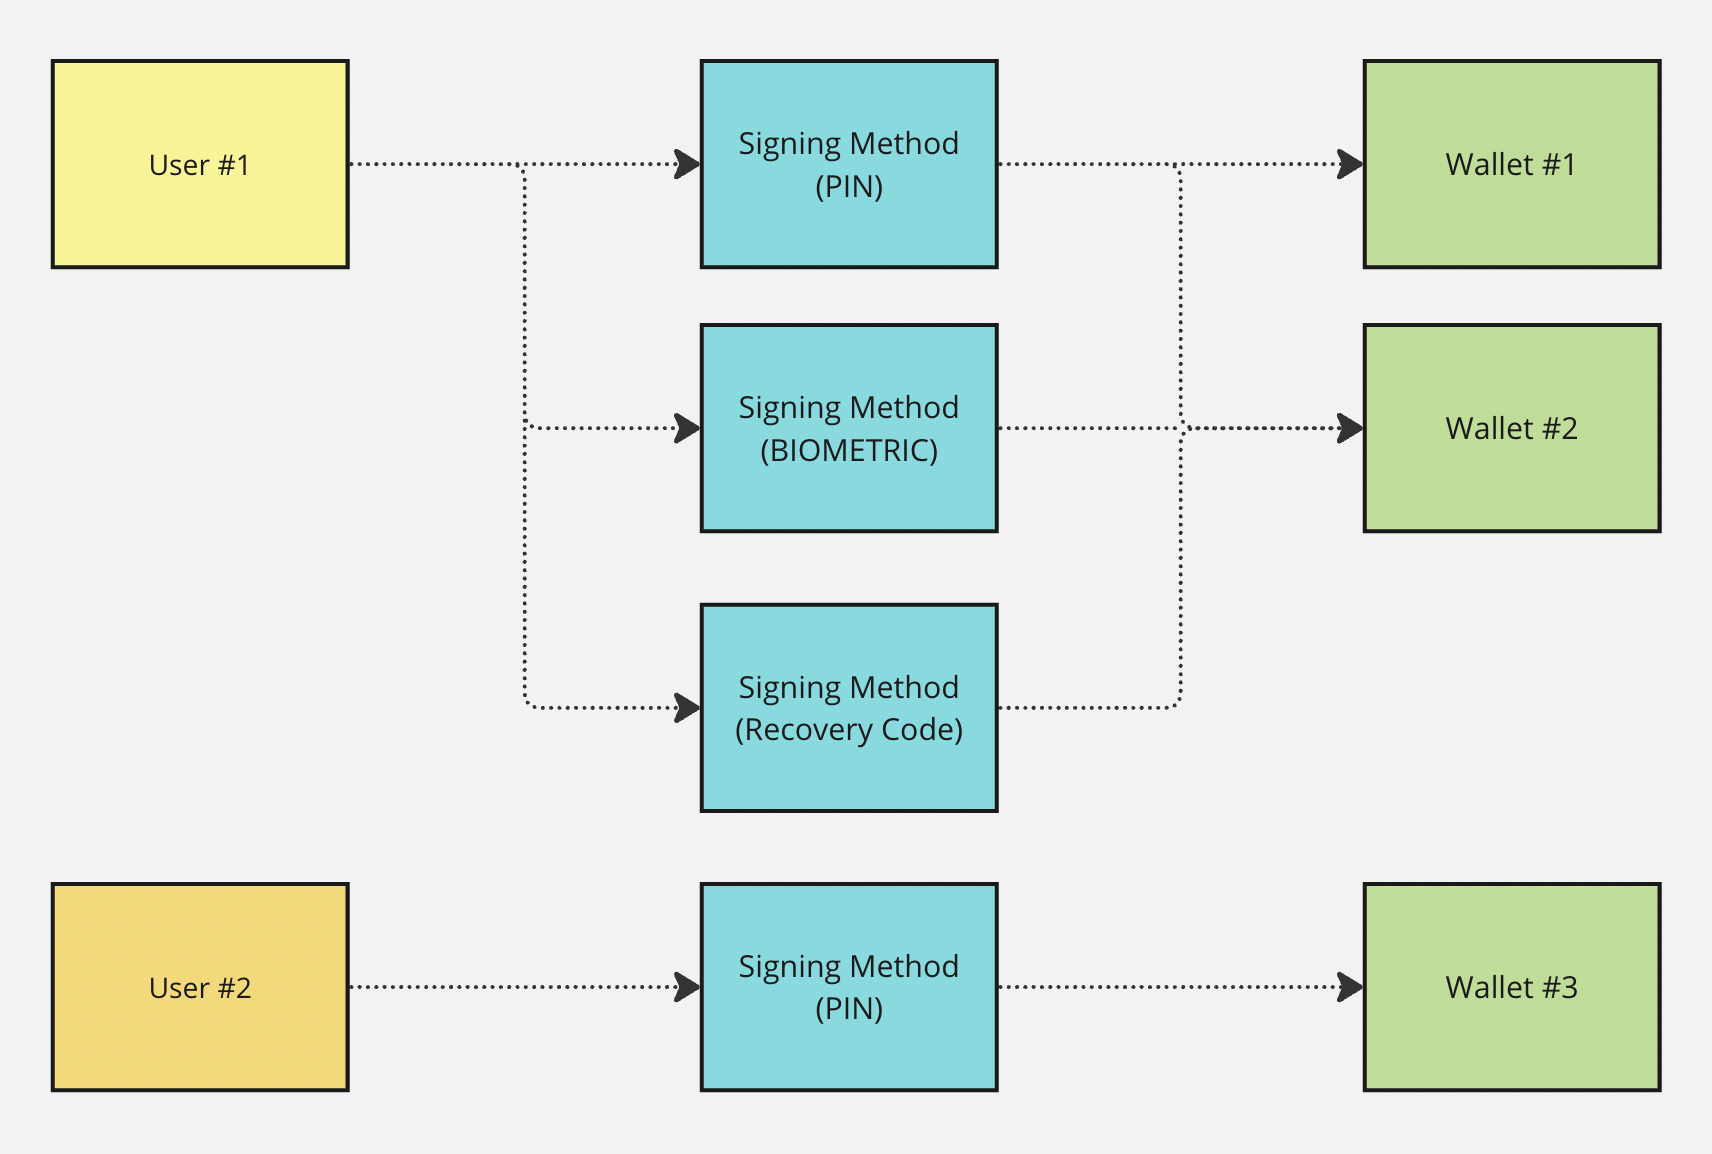
User management flow chart
In order to link your end users with a Wallet API User we suggest to add a reference when creating a User. This reference parameter can be virtually anything that describes a user. Most applications us the user ID in their authentication system. It helps you tell one user apart from another, plus you can also use the reference to fetch wallet information.
We suggest adding a reference to link your end users with a Wallet API User when creating a User. This reference parameter can be virtually anything that describes a user. Most applications use the user ID in their authentication system. It helps you tell one user apart from another, plus you can also use the reference to fetch wallet information.
In practice
Now let's go a bit deeper in the flow and the different endpoints you need to create a user with a signing method and a secure wallet.
1. Create a User
We allow you to define a new user and its signing method in one call. It is not mandatory but it is a nice shortcut. For this example, we will create a signing method along with creating a user.
The
signingMethodobject in body is optional. You can create users without a specifying a signing method.
Request Endpoint: reference
POST /api/users
Request Body:
| Parameter | Param Type | Description | Data Type | Mandatory |
|---|---|---|---|---|
reference | Body | A free-form text to specify a reference for the user you create. It can help group specific users. | String | ❌ |
signingMethod | Body | This object has information about the signing method type and its value. | Object | ❌ |
signingMethod.type | Body | The type of signing method to create for this user. Allowed values: PIN, BIOMETRIC, EMERGENCY_CODE | String | ❌ |
signingMethod.value | Body | The value of the signing method. For PIN, the value should be 6 digits. For EMERGENCY_CODE, the value should be 25 characters, or you can leave it blank to autogenerate the code with the correct entropy. | String | ❌ |
{
  "reference": "ABD User 1",
  "signingMethod": {
    "type": "PIN",
    "value": "123456"
  }
}
Response Body:
Save the following parameters from the response body. They will be used later in the guide.
- result.
id: This is the User ID. Every user you create will have a unique user ID. - signingMethods.
id: This is the signing method ID and will be used for authentication purposes. Every signing method will have a different and unique ID.
{
  "success": true,
  "result": {
    "id": "e85470a8-5deb-41f6-be6c-de693683a22c",
    "reference": "ABD User 1",
    "createdAt": "2023-08-02T07:18:58.624685414",
    "signingMethods": [
      {
        "id": "4658c064-05b9-4bbd-9f0e-68a9588c7bc3",
        "type": "PIN",
        "incorrectAttempts": 0,
        "remainingAttempts": 10,
        "hasMasterSecret": true
      }
    ]
  }
}
2. Create Emergency Code (optional, but recommended)
This example will create an additional emergency code signing method. This emergency code can reset a forgotten PIN code, sign transactions, and authenticate calls.
Signing methods can always be added, updated or removed.
Call the following endpoint to create an emergency code:
Request Endpoint: reference
POST /api/users/{userId}/signing-methods
Path Parameters:
| Parameter | Param Type | Description | Data Type | Mandatory |
|---|---|---|---|---|
{userId} | Path | This is the User ID whose signing method you want to create. Paste the previously saved User ID here. | String | ✅ |
Header Parameters:
For this example, the user already has an existing PIN signing method, that's why we are providing the PIN signing method in the header request to authenticate the call.
A
Signing methodis a authentication method, therefore just like the Bearer token it is placed in the Header
| Parameter | Value | Description |
|---|---|---|
Signing-Method | id:value |
|
Request Body:
{
  "type": "EMERGENCY_CODE"
}
The body does not contain the value property because we want to autogenerate the emergency code.
| Parameter | Type | Description |
|---|---|---|
type | string | This parameter indicates the type of signing method. (e.g., PIN, EMERGENCY_CODE, BIOMETRIC.) |
value | string | This is the value of your signing method. For example, the value for EMERGENCY_CODE can be “w2v7yertaad21lhudqghzwcg4”. To autogenerate the emergency code, this field can be removed. |
For this example, we are creating the emergency code signing method. The principle is the same for creating a Biometric Signing method, though it would require some extra Body parameters. more information on how to set a Biometric Signing method please read our Signing Methods guide.
Response Body:
Description of parameters under the result object:
- result.
id: This is the signing method ID - result.
value: This is the value of the generated emergency code
{
  "success": true,
  "result": {
    "id": "3eccfcef-467a-42a6-8b6b-6ffce3b3b115",
    "type": "EMERGENCY_CODE",
    "incorrectAttempts": 0,
    "remainingAttempts": 10,
    "value": "taif7dxjikhtb82zm7u93tn26",
    "hasMasterSecret": true
  }
}
For more information on user management, please have a look at the following guides.
3. Create wallet
So now we have created one user and provided him with two Signing methods. Another step remains: creating a wallet for our new user, which we will secure by using one of our signing methods.
Request Endpoint: reference
POST /api/wallets
| Parameter | Param Type | Value | Description | Example Value |
|---|---|---|---|---|
Signing-Method | Header | id:value | id: This is the ID of the signing methodvalue: This is the value of the signing method | 4658c064-05b9-4bbd-9f0e-68a9588c7bc3:123456 |
| Parameter | Param Type | Description | Data Type | Mandatory |
|---|---|---|---|---|
secretType | Body | The blockchain on which to create the wallet | String | ✅ |
userId | Body | The ID of the user who you want to link this wallet to | String | ❌ |
Request Body:
{
  "secretType": "MATIC",
  "userId": "e85470a8-5deb-41f6-be6c-de693683a22c"
}
Response Body:
{
    "success": true,
    "result": {
        "id": "10f26e75-1f01-4c46-a2c1-551f886c6db6",
        "address": "0x1bC722F33E62019F1d9CBcc43531c81731023483",
        "walletType": "API_WALLET",
        "secretType": "MATIC",
        "createdAt": "2023-12-06T12:17:36.420854289",
        "archived": false,
        "description": "Self-driven Zebra",
        "primary": false,
        "hasCustomPin": false,
        "userId": "e85470a8-5deb-41f6-be6c-de693683a22c",
        "custodial": false,
        "balance": {
            "available": true,
            "secretType": "MATIC",
            "balance": 0,
            "gasBalance": 0,
            "symbol": "MATIC",
            "gasSymbol": "MATIC",
            "rawBalance": "0",
            "rawGasBalance": "0",
            "decimals": 18
        }
    }
}
So we covered the concepts of
UserandSigning Methodsand created a wallet for a new user with two signing methods. To dive a bit deeper in Signing Method, we recommend reading the Signing Method guide. If you feel you have grasped the concepts, a good place to start is the Getting started guide or any of the Basic Guides.
Updated 4 days ago